Wednesday, May 20, 2015

Cooking class: Early summer entertaining with crisp greens and whites (and the scents of new season's green tea and the sea)

"Scented breeze across hills of spring verdure": see the little napkin and menu "hills"?

I had been lurking at the inspiring food and table blog Lovely place for some time, admiring the table coordination lesson pics, when it struck me that I could probably track this class down and attend myself. And with a bit of sleuthing, I did!

ATELIER Let's Have a Party! is run by a one-woman dynamo whose unassuming air belies a kick-ass knowledge of all aspects of entertaining, from flower arrangement, to table decorating, to meal planning. She makes her own table cloths, napkins, decor items and, having previously been a pottery teacher, even some of the tableware! She also has a deep knowledge of the sophisticated world of traditional Japanese colours. It is like a whole new language that I hadn't come across before as a Japanese-English translator. Actually, even the themes for her lessons are beautifully poetic and I'm having real trouble translating them into similarly poetic English. Long story short, I really like Oba-sensei's style!
Place setting

This is was my second lesson, after being thoroughly impressed at April's cherry blossom-themed class. This time, the theme was, pardon my translation, "Scented breeze across hills of spring verdure: Entertaining on the 88th day of spring." Inspiration came from the tiered rice paddies traditionally planted and new green tea traditionally harvested around that date (May 2 this year), which is marked on the traditional Japanese calendar as a time when the seasons change. It certainly felt like early summer the day my friend and I took the lesson!

After a short introduction to the day's theme, explanation of the specialist terms and concepts (not only for my benefit ; )), and rough overview of the cooking portion of the class; we got to work. First the flower arranging, then setting the table, then the cooking, and finally, the eating : )


Nori-dusted pork parcels with green tea salt
On the menu: 
Spring veggies in a kombu-cha dressing
Ginger-sesame salmon rolls
Green tea soba salad with tomato-wasabi dipping sauce
Nori-dusted pork parcels
Served with: Chilled green tea and an unsweetened matcha liqueur

All were delicious, but I got particularly excited by the salmon rolls and that tomato-wasabi dipping sauce. Those big, punchy flavours are right up my alley!

Sensei buys in dessert. This time it was (from left to right) matcha waffle, matcha and nut yokan (hard jelly), and nori-scented rice puffs. A lovely blend of sweet and savoury flavours that echoed the tea-and-sea aromas of the rest of the meal.
Sweet and savory dessert in green tea and nori flavours
Greens, in this case "matcha" green and "new-leaf" green, are really popular in Japan at this time of the year, when all around the world springs back to life, before getting truly, wildly green during the rainy season. Such a shame that sensei got her gorgeous green chargers and plates in the US, so I can't get some myself... Not to worry, I did my own (much less elegant) green table, with the flower arrangement we made in this class and what I have at home, inspired by the hydrangeas that are budding all around : )


Tuesday, April 7, 2015

Hina-Matsuri Birthday Party: Tri-colour sushi "cake"

Tri-colour sushi "cake"
I had a girly Hina-Matsuri themed birthday party this year and this tri-colour diamond-shaped sushi "cake" was the centerpiece dish. 

Brightly coloured sushi is a feature of the Hina Matsuri (Girls' Day or Doll Festival) spread. 
I plotted this for a few weeks, checking out various ideas online here and here, and in the March 3 editions of Orange Page magazine, which has a Hina Matsuri feature most years (this year's edition was especially helpful). In the end, I took ideas from many places and mashed them up as I went along.

I couldn't exactly call this a "piece-of-cake" recipe (sorry, couldn't help myself ; )), but you will feel like a real Japanese domestic goddess if you take it on! In the end, I entrusted a dear friend to the decorating as I tussled with the rest of my ever so slightly over-ambitious menu. Thank you, M-san, for the fabulous job!

Here's the plan of action:
Make your diamond-shaped rice mould (a day or two ahead)
Make pickled lotus root flowers (a day or two ahead)
Dye daikon cherry blossom petals (optional; a day ahead)
Make sweet simmered shiitake (on the day)
Make omelette ribbons
Make sushi rice
Blanch snow peas and prep garnishes
Buy sashimi and form into "roses" 
Assemble

And the shopping list:
dashi powder
Japanese rice vinegar
Japanese soy sauce
sugar
salt
dried chilli
lotus root
daikon (optional)
dried shiitake (a meaty Japanese variety, for preference)
eggs
katakuriko (starch thickener; optional)
short-grain ("sushi") rice
Tamanoi Sushinoko powdered sushi seasoning (or homemade sushi vinegar, recipe included)
snow peas
shiso (perilla) leaves
frozen edamame (soy beans)
sakura dembu (pink fish "fluff"), or grated carrot, if unavailable
sashimi
gari (pickled ginger slices)


Tri-colour sushi "cake"

Serves 6-8

For the rice mould

Open up an empty and washed 1 l milk or juice carton by cutting down one of the corners (avoid the corner with the seam) and around the base. Cut off the square that was the base, and the section that was the spout. You should be left with a rectangle. Cut in half across the width, creating two thick strips. Tape the short ends of the strips together to form a square.

For the subasu spicy pickled lotus root

half a section of lotus root (approx. 7 cm long)
splash of Japanese rice vinegar

For the amazu sweet vinegar pickling liquid:
2.5 tbsp (38 ml) dashi stock (made with water and a pinch or two of dashi powder)
1.5 tbsp (23 ml) Japanese rice vinegar
1 tbsp sugar
pinch of salt

1 dried Japanese red chilli, sliced finely
1 cup (200 ml) boiling water
1.5 tbsp Japanese rice vinegar
pinch of salt

1 Peel lotus root with a vegetable peeler. Cut away sections of flesh between the holes of the root to create a flower shape (optional). Slice the root into rounds 5-6 mm thick. Soak in water with a splash of Japanese rice vinegar added to it.

2 Make the amazu pickling liquid. In a small pot, heat the dashi stock, rice vinegar, sugar and salt. When the sugar has dissolved, remove from the heat, add the sliced dried chilli and allow to cool.

3 Bring the water to the boil, add the rice vinegar and salt. Boil the lotus root for 1-2 min, or until slightly transparent, and drain immediately. Take care not to overcook or the texture will become unpleasant.

4 Place the cooked lotus root and the pickling liquid in a zip-topped bag and leave to marinate for a day in the fridge. 


For the daikon petals, if making

Cut three to four 5 mm thick slices of daikon and press out shapes using a cherry blossom petal vegetable cutter like this one. Mix just enough water to cover the daikon petals with a little red food colouring. Soak the petals in the solution until they reach the desired colour.

For the sweet simmered shiitake

4 large dried shiitake 
1 cup (200 ml) water
1 tbsp sugar, divided
1 tbsp Japanese soy sauce

1 Place shiitake, water and 1/4 tsp of the sugar in a bowl. Mix and cover with wrap, pushing the wrap down on the shiitake to keep them submerged. Leave for 1-1.5 hours. Once re-hydrated, gently squeeze the liquid out of the shiitake and slice thinly. Reserve the soaking liquid.

2 Place the soaking liquid, soy sauce and remaining sugar in a small pot, stir, add the sliced shiitake and bring to the boil over medium heat. Skim off any scum that forms. Reduce heat to low and simmer for 8 min. Remove from the heat and allow to cool.

For the omelette ribbons

2 eggs, lightly beaten
1/2 tsp sugar
1/2 tsp katakuriko (optional, but helps prevent tearing)
pinch of salt
vegetable oil

1 Mix all ingredients, except the oil, together in a bowl.  

Heat a medium frying pan over medium heat. Brush with just enough oil to create a thin film. Pour in half the egg mixture and swirl to cover the base of the pan. Once the surface dries, turn the omelette (slipping a single cooking chopstick under one corner and picking up the egg in one go, if you fancy trying the Japanese method). Cook quickly, then flip onto a plate. Repeat with the remaining egg.

3 When cool enough to handle, cut omelettes into quarters. Stack the quarters and fold in half. Slice into fine ribbons.

For the sushi rice

3 rice cups (450 g) short-grain rice
Either
3 tbsp (45 ml) Sushinoko powdered sushi seasoning
or (homemade sushi vinegar)
6 tbsp (90 ml) rice vinegar
2 tbsp (30 ml) sugar
1.5 tsp salt

1 Cook rice as usual if using Sushinoko, or using slightly less water if making your own sushi vinegar.

2 For the sushi vinegar (if using), mix the vinegar, sugar and salt together in a bowl. 

3 Once the rice is cooked, sprinkle with the Sushinoko or rice vinegar, and stir. Turn the rice in a folding motion while fanning it to create a sheen. Once the grains are glossy, cover rice with a damp cloth and leave to cool.

For tri-colour rice and garnishes

1 handful of snow peas, blanched
shiso (perilla leaves), stems removed
1/2 a Japanese cucumber, grated
400 g bag of frozen edamame (soy beans), defrosted and podded
good few shakes of toasted sesame seeds
sakura denbu (pink fish "fluff"; if unavailable, use grated carrot)
150 g of red and/or orange sashimi (tuna and salmon are good)
slices of gari (pickled ginger)

1 Divide rice into thirds and place in 3 bowls. In one bowl, make green rice by mixing through the cucumber and most of the edamame. In another bowl, make yellow rice by mixing through enough sesame seeds to make it interesting (I used around 3 tbsp). In the third bowl, make pink (or orange) rice by mixing though sakura dembu (or grated carrot) until you reach the desired colour.

2 Cover the centre of a large platter with wrap and place the rice mould on top in a diamond shape. You may need to use bottles or similar around the outside of the mould to help keep the shape while you layer in the rice. 

3 Gently pat the green rice evenly into the mould, making sure to reach all the way to the sides and into the corners. Repeat with the yellow rice, then the pink (or orange) rice. Make sure your cake is firm by pressing gently on the sides of the mould, then cut the mould away. 

4 If the sashimi slices are thick, flatten gently with a rolling pin or similar, place a slice of pickled ginger on top of each slice, then roll them into rose shapes.

5 Top the rice diamond with the omelette ribbons, then the simmered shiitake. Decorate with the shiso, snow peas and sashimi roses. Make sure a little of everything peeks out. Garnish the plate with the pickled lotus root, if using, and the remaining snow peas, shiso and sashimi roses. Lastly, sprinkle with the remaining edamame and dyed daikon petals, if using.

Enjoy!


Friday, April 12, 2013

Cooking class: Everything coming up cherry blossoms

When checking out the offerings of Japanese cookbooks after the New Year holiday, I came across one with a recipe for yuzu-flavoured scallop date-maki which, as a big fan of yuzu and scallops, really got my heart racing. A how-to of plating techniques that just happened to have recipes, the book was right up my alley, and came home with me the very same day. Written by the daughter half of a mother-daughter cooking school and table coordination combi, it pointed me in the direction of their lovely blogs (mother and daughter), the photos on which had my tummy rumbling on many a long homeward commute since I can tell you!

I was particularly struck by the mouthwatering blog photos of the sakura-themed cooking class, and reading that there were a small number of places still available, arranged to go on the last session offered, which happened to be the day before I was having guests.


Welcome drink: Sakura-yu cherry blossom "tea"
 It was rather a hike out to Nakamura-sensei's home in the picturesque woods of Chiba, a good two hours from Yokohama. The long journey was soon forgotten, however, when I met sensei. A more charming, knowledgeable and kind teacher you could not hope to have. The earliest arrivals sipped sakura-yu, a fragrant "tea" of preserved cherry blossoms, while we waited for the last two students to turn up. All assembled and aproned up, the five of us put together the the amazing spread above over the next 3 hours, but it never felt rushed or like hard work. 

On the day's menu:

A meal of spring delights
In the bowl:
Eel and prawn-filled lotus root balls in thickened yuzukosho (yuzu and green chilli) dashi soup

In the cocktail glass:
Firefly squid jelly topped with onsen tamago (eggs with cooked yolks and loose whites) and dashi gelee

On the dinner plate from top left:
Yuzukosho sauce for dipping the bamboo shoot coquettes
Bite-sized steaks with wild spring vegetables and sesame dressing
Kombu-jime sushi wrapped in sakura leaf
Bamboo shoot coquettes with yuzukosho sauce

On the side plate:
Yuba rolls with chicken fillet, rape blossoms and wasabina leaf mustard, again with dashi gelee

Sakura pound cake

There was a great deal to learn, both in the cooking and the plating and table decoration fronts. Sensei gave me special instructions on 3-hour dashi and how to make gari sushi shop-style pickled ginger, as well as explaining the method of preserving sashimi by sandwiching it between sheets of vinegared kombu kelp. I also learned a delicious way to prepare seasonal Japanese veggies udo (aralia cordata), kogomi (ostrich fern) and tara no me (buds of the angelica tree) that I had long passed over in the veggie shop for lack of knowing how to prepare them. I particularly liked the crunchy udo. Must have a look for some more recipes for that : )


Main dish set to the correct orientation

On the plating front, we learned the correct way to serve a main dish (wrongly oriented in the photo above), how the tiniest sprinkling of matcha can transform a white plate, and how to make decorative "cherry blossom petals" from the odd end of a daikon!

I also got the recipe for perhaps the loveliest cake you can ever bake in under an hour! The secret to making a pound cake lovely and moist, I learned, is to cover it with wrap while it cools. For a non-baker like me, that was a total revelation!

A feast of sakura: Sakura leaves, sakura bean paste and blossoms baked to perfection
Sitting down to eat at the gorgeous table, I found I had few words as I took each mouthful of truly amazing flavours and textures, savouring every moment.

If not for the distance, I would love to become a regular at Y's Kitchen. As it is, I think I may have to take a day or two off work this year to go on a weekday.

 And that sakura pound cake? Truly as amazing as I thought it would be, it appeared on my Persian New Year spread the very next day!


Cherry blossom dainties II: Kansai-style sakuramochi

Kansai-style sakuramochi
The arrival of spring is awaited in Japan with much longing from the very first day of the New Year, which tradition, if not the weather, claims as the "first of spring".

Closer to the true arrival of warmer days, the Bureau of Meteorology starts to chart the (forecast) arrival of the much beloved cherry blossoms (sakura) on a 7-stage scale, from budding, to first blossoms, to full-bloom, to blossoms-and-leaves on a "sakura front". As of late February, the front was predicting full-bloom in Tokyo/Yokohama on March 25, rather earlier than usual. However, a burst of very warm weather in mid March had the Bureau calling "full-bloom" on March 23, the second-earliest such call on record! Luckily, the weather turned cool again immediately after, and we had a long two weeks to enjoy the fleeting pleasures (and cherry blossom viewing parties under the boughs) of the sakura season.

Sakuramochi are the Japanese sweet of the cherry blossom viewing season. There are two basic types:  (1) Kanto-style (Tokyo and surrounding areas) sakuramochi, which consist of a ball of koshi-an (smooth adzuki bean paste) wrapped in a pink-tinted pancake made from rice flower, topped with a preserved cherry blossom (like the ones I made last year), and (2) these Kansai-style (Osaka and surrounding areas) sakuramochi, in which the balls of an are covered with pink-tinged glutinous rice and wrapped in an edible preserved sakura (cherry tree) leaf. Both are delicious, but the Kansai style might be a little bit trickier to make (if my maiden effort is anything to go by). But only in as far as the sticky rice layer is, well, sticky ; )

It's hard to describe the scent of sakura leaves; it is something like the the scent of flowers and incense remembered in a dream. They have a lovely floral flavour, too, heightened by the slight saltiness that remains even after soaking them to remove the salt they are preserved in. I bought a pack of 45 from Tomizawaya, where you can also get the an powder (or prepared an) and domyoji-ko (dried pre-steamed sticky rice) rice needed to make these lovelies. The good news is that any leftover leaves can be frozen for later use.

Since I don't make sweets much, never mind Japanese sweets, I chose the powdered an last year. There was plenty left over for making these this year, and a sakura pound cake I made last weekend. This, along with a longer use-by date (don't you hate being under pressure to "use up" special ingredients?...), makes the powder the right choice for me. It does add the extra step of reconstituting the an. That only takes a couple of minutes, though, so no biggie.

This recipe is from a leaflet I picked up at Tomizawaya. It is for 15 sakuramochi, and that's what I made, but it's such a tricky number. I'd advise making 16 instead. They will be plenty big enough.

Since the much-loved whitish variety of sakura had finished blooming by the time I made these, I made the rice layer a darker pink, similar to the later-blooming varieties. Typically, Kansai-style sakuramochi are a more subtle pink. The choice is yours.

Kansai-style sakuramochi

Makes 15-16

For the an

72 g Tomoe koshi-an powder
216 ml water
160 g white sugar
or 300 g prepared koshi-an

150 g domyoji-ko
70 g white sugar
280 ml water
pinch natural red food coloring
15 preserved sakura (cherry tree) leaves

1 Soak sakura leaves in water for 30 min to remove the salt. Dry well with kitchen paper.

2 To make the an if using the powder, bring the water and koshi-an powder to the boil, reduce the heat to medium, add sugar and stir until thickened, taking care not to allow the an to burn. Remove from the heat and allow to cool.

3 Mix the sugar and water in a small pot and bring to the boil, then remove from the heat. Add red food colouring a little at a time to achieve the desired colour.

4 Add the domyoji-ko and cook, stirring with a wooden spoon, over a medium heat for 7-8 min. Remove from the heat. Make a cartouche (covering) from kitchen wrap and place on the surface of the domyoji-ko mixture and leave to steam for 40 minutes.

5 Divide the an into 15 or 16 equal-sized pieces and roll into balls.  Divide the steamed daimyoji-ko mixture into 15 or 16 equal-sized portions. With slightly wettened hands, cover each an ball with a piece of the daimyoji-ko mixture and wrap in a sakura leaf, with the vein side on the outside.

Meshi-agare!

Wednesday, April 3, 2013

More negishio: Chicken & sugar snap peas with Japanese leek and salt dressing

Chicken & sugar snap peas with Japanese leek and salt dressing
My earlier post on negishio has been the most popular here at Miso and Yuzu since I posted it. There was even a spike of interest in it a couple of weeks ago after a debate about scallions broke out on eGullet!

In this take, the chicken is stir-fried with the peas and the dressing stirred in right at the end. You don't get crispy chicken skin, but it is a deliciously moreish mouthful anyway.

We had this with a tuna and pea rice dish, and it was a wonderful spring meal to coincide with the earlier-than-usual arrival of the cherry blossoms!

Chicken & sugar snap peas with Japanese leek and salt dressing

Serves 4

For the dressing
4 tbsp finely chopped Japanese leeks (negi)
2/3 tsp salt
4 tsp toasted sesame oil
1/2 tsp coarsely ground black pepper

2 boneless chicken thighs
4 tsp katakuriko potato starch
200 g sugar snap peas, topped and tailed
2 tbsp vegetable oil, separated

1 Mix the dressing ingredients together in a small bowl. Slice the sugar snap peas in half on the diagonal.

2 Cut the chicken into bite-sized chunks and place in a bowl. Sprinkle with salt, katakuriko and 1 tbsp of the oil, tossing to mix after each addition.

3 Heat the remaining oil in a frying pan over a medium-low heat. Add the sugar snap peas and stir-fry for about 1 min. Add the chicken and continue stir-frying, breaking up the meat as you go.

4 Once the meat changes colour but is not quite cooked through, add the dressing and turn up the heat. Stir-fry for 1-2 min longer until cooked through. Transfer to a serving dish.

Enjoy!

Recipe source: Orange Page April 17, 2010 edition (no longer available for sale)

Wednesday, January 30, 2013

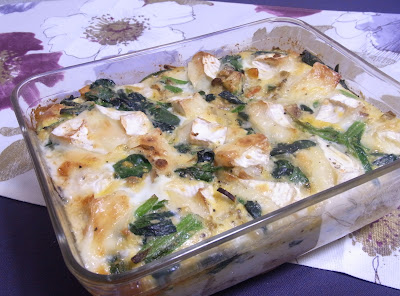
Heaven in an oven dish: Scallop and Camembert bread quiche


Scallop and Camembert bread quiche
Imagine it: thick cubes of bread steeped in a custard redolent with the luscious, heady scent of scallops, topped with wedges of Camembert and baked until it all oozes with succulence. It's an early call, but I am thinking this is a sure contender for Recipe of the Year!

The original recipe was in an ad for Megmilk Snow brand dairy products in the pre-Christmas December 17, 2011 issue of Orange Page. It is lovely and celebratory, but also ticks the thrifty boxes required for the Kechi (miserly) Cooking Month kick I am on after the Christmas-New year blowout. A few scallops will go a long way baked into a quiche like this : ).

I used scallops with the roe attached, although the recipe calls for the white muscle meat only.

In Japan, the local Camembert sold in supermarkets comes in 100 g wheels, which can be cut into nice little triangles to top the quiche with.

Scallop and Camembert bread quiche

Serves 4-5

200 g Camembert cheese (2 wheels of Japanese Camembert)
2 slices of thick-cut bread
12 scallops
7 eggs
190 ml milk
4 tbsp grated Parmesan cheese
1 tbsp olive oil
1 small onion, finely sliced
1 bunch (around 200 g) spinach
4 tbsp white wine

1 Heat the oven to 180 degrees C. Cut each wheel of cheese into 12 triangles. Quarter the scallops. Cut the bread into 9 cubes per slice. Wash the spinach, drain and cut into 4 cm lengths.

2 Line the bottom of a large oven-proof dish with the bread cubes. Break the eggs into a large bowl and whisk with a fork. Add the milk and Parmesan cheese and season to taste with salt and black pepper. Mix again and pour enough of the mixture over the bread to cover it. Set aside for a few minutes to allow the bread to absorb the egg mixture.

3  Heat the oil in a frying pan over medium heat. Fry the onion until soft. Add the spinach and scallops and stir to combine. Pour over the wine, stir and season with salt and black pepper. Spoon the mixture on top of the egg-soaked bread, then top with Camembert triangles placed randomly. Pour over the remaining egg mixture and bake for 35-45 min, or until a skewer inserted into the middle of the quiche comes out clean.

(Adapted from a recipe in the December 17, 2011 issue of Orange Page)

Enjoy!

Friday, January 25, 2013

Happy New Year 2013: Osechi Tier 3

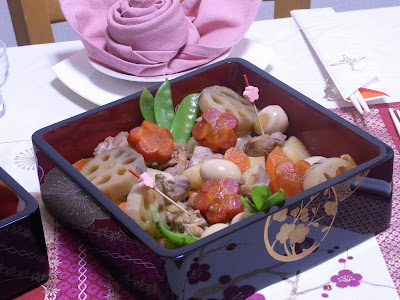
Osechi tier 3: Simmered stew
Spicy chicken and root vegetable nishime stew, ninjin no ume-ni plum-blossom carrots simmered in dashi and umeboshi pickled plum, snow peas

1. Koh Kentetsu's spicy chicken and root vegetable nishime stew
Symbolizes family togetherness
Time/Effort: * Cost: * Flavour: ***

Nishime is a kind of stew that is simmered until most of the cooking liquid has evaporated, then given a glossy sheen with a final blast with sugar and/or mirin.

The nishime served as part of Osechi, also called chikuzen-ni, has been a bit of a stumbling block for me for years, as it often contains some of my least-liked Japanese vegetables (satoimo taro, takenoko bamboo shoots and gobo burdock root, which I admit is now growing on me ; )). When I found this recipe, sans all the aforementioned ingredients, from my favourite food writer working in Japanese, Koh Kentetsu, I knew I'd hit the jackpot!

I found I had a lot of liquid left at the end of the specified cooking time (perhaps I messed up my calculations when I doubled the recipe?). But far from a problem, this was a real boon when I couldn't be bothered cooking the next day and had it as soup : D. If this should "accidentally" happen again, I will just remove some of the soup to a smaller pot and reduce it to the right consistency and mix it into the portion of stew that I serve.

This recipe uses the ran-giri cutting technique. This decorative Japanese cutting style increases the surface area of the cut pieces, helping them to cook more evenly. Basically, it involves cutting a long, round vegetable on the diagonal, turning the vegetable as you go, as demonstrated in this video.

Serves 4. Keeps for 2-3 days in the fridge.

1 tbsp toasted sesame oil
2 boneless chicken legs, skin on (around 500 g)
2 potatoes (around 250 g)
1/2 a lotus root (around 100 g)
1 carrot (around 100 g)
8 cooked quail's eggs

For the cooking liquid
2 cups water
1/2 cup sake
3-4 tbsp Japanese soy sauce
3 tbsp sugar
2-3 dried red chillies, or to taste

1 Remove any visible yellow fat from the chicken and cut into large bite-sized pieces. Season with salt and black pepper. Peel the potatoes and cut into chunks. Peel the lotus root and cut into slices 1 cm wide. Peel the carrots and cut into bite-sized ran-giri pieces. Drain store-bought cooked quail's eggs or cook fresh quail's eggs for 4 minutes in boiling water and peel carefully. Cut the stalk end off the chillies. Mix together the cooking liquid ingredients in a bowl. Make a cartouche slightly smaller then the diameter of your pan and cut a 2 cm hole in the middle.

2 Heat toasted sesame oil in a large pan over a medium heat. Place the chicken pieces in the pot skin-side down and cook until on both sides until lightly browned. Add the lotus root and carrot and stir-fry until coated with the oil. Pour in the cooking liquid and bring to the boil, scooping off the scum that rises to the surface.

3 Drop the cartouche on top of the stew and simmer for  about 10 minutes. Add the quail's eggs and potatoes and replace the cartouche. Simmer for a further 15 minutes, stirring from time to time.

(Adapted from a recipe in the January 2, 2009 issue of Orange Page)

2. Ninjin no ume-ni plum-blossom carrots simmered in dashi and umeboshi pickled plum
Time/Effort: *** Cost: * Flavour: ***

I've often looked at the adorable three-dimensional carrots in the Osechi manuals and thought they would be much too hard to make. This year I took the carrot by the stalk, as it were, and gave it a whirl. Guess what, it's not nearly as hard as it looks (as demonstrated in this video). In fact, there is even a way to make these decorative carrots if you don't have a plum blossom veggie cutter!

Many recipes for plum-blossom carrots just simmer them in a bit of dashi and soy sauce, but the idea of simmering them in actual umeboshi pickled plums appealed to my cheekier side. I used the super-red kindoki ninjin variety here to contrast with the regular carrots in the stew.

1/2 a kindoki ninjin red carrot
400 ml dashi stock
4 tbsp sugar
3 tbsp usukuchi (light) Japanese soy sauce
2 umeboshi pickled plums (low sodium for preference)
pinch of salt

1 Cut carrot into 1 cm-thick coins and cut out plum blossom shapes using a veggie cutter.

2 At the point where the petals join, make 4-5 mm deep cuts into the center, like the spokes of a wheel. Beginning 1/3 of the way between two petals, remove a small piece of carrot by cutting diagonally toward the cut that you made. Repeat with each petal until you have a three-dimensional plum blossom. Repeat with the rest of the carrots.

3 Bring a small pot of salted water to the boil and parboil the carrots. Drain and cool in cold water.

4 In the same pot, bring the dashi, sugar, usukuchi soy sauce to the boil. Add the carrots and umeboshi pickled plums, reduce the heat to low and simmer for 4-5 min. Set aside to cool in in the cooking liquid.

(Adapted from a recipe in Osechi to kigaru na omotenashi (Osechi and easy dishes for entertaining))

3 Snow peas

String and cook briefly in boiling water. Make "fans" of three snow peas and tuck into the stew as a garnish. My guess is that this presentation represents either the kadomatsu New Year's entrance decoration or the stylized matsu (pine) motif so popular at Japanese New Year.